Filters enable you to define selection criteria and display preferences. The filters applied to reports also enable you to define the format of output files, if any.
You need to define at least one filter for each function of the list below, in order to use these functions. The filtering elements depend on the function to which the filter relates. For more information on filter creations, see the topic that corresponds to the function. For more information on the other functions of filter management (modification, deletion, etc.), see the topics below.
When creating report filters or display filters for the budget sheet, you can copy the settings of an existing filter.
- In the setup page for filters, click the Copy button.
Info
The setup page for filters is displayed when you click Configure in the creation page for filters.
The selection page for filters is displayed.

- Click a filter in the list to select it and click OK.
- The setup page for the filter being set up, is redisplayed with the copied settings of the other file.
In the Filters toolbar at the top of the page, select the filter to modify in the Active Filter dropdown list, then click the Modify button.
The modification page for filter settings is displayed.
You can access the same setup fields as on the creation page, except for the filter identification page (only accessible for the creation of the filter). For more information on the fields related to the filters of each function in Liquidity, see the topics that deal with these functions.
Info
When you click OK, the filter settings are applied without being saved. If you want to keep these settings for this filter, you need to save them by clicking Save before OK.
To delete a filter, you need to access the setup module of Sage XRT Treasury.
- In the accordion of the Modules Tasks pane, select the Setup module, then in the upper part of the pane, select the Command filters option in theSetup folder of this module.
The selection page for command filters is displayed.
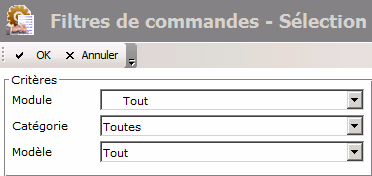
- Select the Liquidity option in the Module dropdown list.
- Click OK.
The setup page for command filters is displayed, together with the list of the filters linked to the Liquidity module.
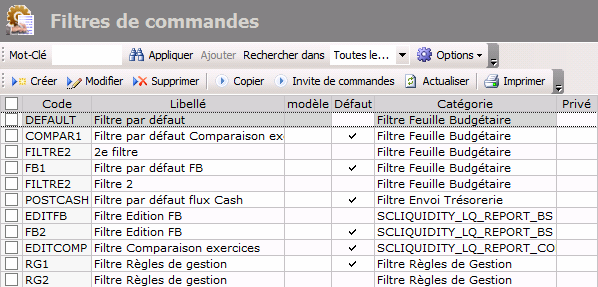
- Enable the option in front of the filter to delete and click OK in the actions toolbar.
- Click Yes in the dialog box to confirm the deletion.
The filter is deleted.
- In the Filters toolbar at the bottom of the page, select a filter in the Active Filter dropdown list.
- In order to apply automatically the selected filter to the selected function, click the Actions button, then enable the Auto Apply option.
If this option is not enabled, you need to click the Apply button in the filters toolbar to apply the selected filter.
You can save the settings currently applied in another filter, without overwriting the settings of the last selected filter.
In the Filters toolbar of the report page, click the Actions button, then select the Save to file option.
The creation page for filters is displayed. See the topics above for more information on filter creation.